Showing posts with label Bound Seam. Show all posts

Sunday, 28 June 2020

Seam Finishing Without a Serger

My decades old serger has not been sewing a decent seam finish lately.  It's time to take it in for servicing or ~gasp~ think about replacing it.  Both of these options won't be happening anytime soon with how expensive life has become since the arrive of the pandemic and I'm about to be laid off from work. Needless to say, I'm really watching my pennies nickels.  

Self-threading serger, {source}

Unless, I win the big prize of a lottery or save up enough nickels.  Yup, a nice dream, but I digress... Until that dream comes true, I'll be returning to the BS life (before serger).  


Thankfully, my sewing machine comes equipped with decorative and zig-zag stitches that I can adapt into seam finishing options.  These will work on the current project that I need to finish, I think I will go with the first stitch on the left for this embroidered corduroy fabric.  

Other types of fabric will require other seam finishing techniques. Sheer, light-weight fabrics will be best handled with a French seam finish.  Fabrics prone to fraying can be treated with bound seams. Thank goodness there's a bias tape maker in the sewing basket to make bias tape

There is a welcomed sense of slowing down the process and thinking about how to finish a seam without the speed of a serger. Maybe, returning to the basics is just what might kick-start the sewing mojo?  

Do you have a favourite non-serger seam finish that you like to use?  

Stay Safe, Be Kind and Happy Sewing!  

Friday, 7 June 2013

New Spring Coat: Burda 7304

Stash Busting 2013:  Project #22

Fabric Used:                  3.2 metres 100% polyester fabric

Pattern Used:               Burda Style 7304

Seam Binding Used:  15 packages of seam binding.

Buttons:                         Six

*****
“The great doilies are stories in crochet, with a beginning, character development, and plot twists, periods of conflict, growth, and redemption. And the best of them have slam-bang endings.” 
~Doris Chan~

This project certainly had its challenges. I don't know where to begin.  

1.  The Fabric!  
I believe that I actually gasped when I first spotted this bolt of fabric in the home decor department. It is a 100% polyester, not the kind of fabric I usually fall head over heels over, rather it was the texture and print that won me over. I fell for the doilies that graced the surface of this fabric.  

This fabric proved to be a challenge to press and finish. Oh my goodness, did it ever fray! I finished all the seams with a bound seam finish. I didn't make my own bias tape. I cheated and picked up several more than several packages of pre-made seam binding.

I went against Burda's advice to use a fulled fabric.
Fulled fabric is a kind of felted wool, the surface of the wool is slightly felted so that the right side looks the same as the wrong side. The quality is smooth, but sturdy, and has a perfect wearing ease. You usually sew jackets from it without lining, which are perfect for autumn and any transitional season. Due to its property, edges need not be neatened, the fabric does not fray and is comparable with fleece.

Garments sewn from fulled fabrics have got volume and stability, and look nice from both sides.
Do I love my fabric? Absolutely! But next time if I reuse this pattern, I will look for a fabric that is suggested by Burda.

2.  Bound Seams!
I love the look of this coat from the inside. All the seam edges are finished with bound seams, it was a lot of work though. This coat would have been pieced together a lot quicker if I serged all the edges. Despite the time-consuming work, I'm glad I bound those fraying seams.

3.  Pressing!
Everyone who sews knows that pressing is one of the most important steps to creating a well-made garment. Sew I won't go on about this step other than thank goodness for my tailor's and sleeve hams.

Despite all the challenges this fabric and project provided, it will go down with one of the most rewarding.

Happy Sewing!


Sunday, 2 June 2013

Progress on Burda 7304

It has been a week since I sat down to work on the coat. I've been busy fighting a cold, still.

But this weekend I was back at it. Let's see, I've finally finished the sleeves and cuff feature. Along the way I finished off a few more package of bias tape.

Under collar
The only part of the coat that does not have bound seams is the inside of the collar.
Both the upper and under collar have pinked edges.  


Right now I'm finishing the outer edge. Burda suggest using a fulled fabric for this garment. Life would have been so much easier if I listened to this piece of advice.  

Fulled fabric, according to Burda, is a like a felted wool that does not fray. This is not the kind of fabric I chose, so I'm finishing off these edges with more bias tape.

I think it just might be safe to say that I spent more money on bias tape than I have on the fabric.

There is much more work to do but I think it is time to call it a night and make a cup of tea.

Happy Sewing!

Monday, 27 May 2013

Progress on Burda 7304

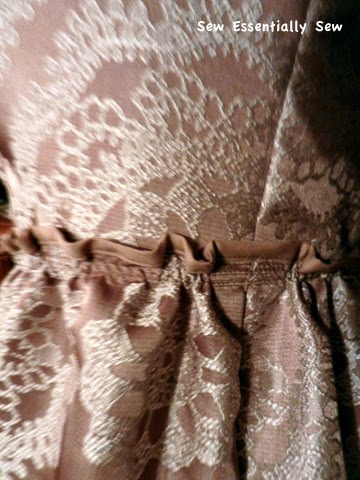
Waistline gathers
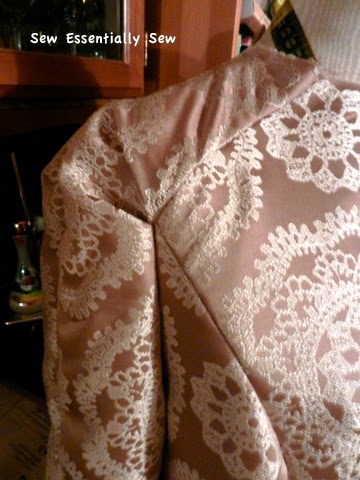
Sleeve Pleats
I finally figured out how the sleeve pleat works! Basting is a very important step.

There is only one sleeve done. But I thought I would snap some photos. I'm actually kinda giddy that it worked out.

Still hurting from that back injury so this project has been proceeding at a snail's pace. The sleeve is all I managed to get done this weekend. Well, I also did manage to finish off the sleeve seam edges with the bound seam finish.

Tonight though, I'm going to lay low and take a wee break from this project. Perhaps tomorrow night I'll tackle the other sleeve.

Happy Sewing.


Sunday, 26 May 2013

All Bound Up

Have you seen this little tool before? It is called a binder foot. It is suppose to a handy little tool to help in attaching bias tape.

For thinner widths of bias tape you would feed the tape through the grooves on the side choosing the appropriate sized groove.  The choices vary from the five holes located on the conical tape guide. If you have a wider width of bias tape you and feed it directly into the inside of the conical tape guide from the front of the foot. That is the bonus of this foot there are lots of options when it comes to tape widths.
I'm not sure if you can tell in the the above photo but at the narrowest point of the conical tape guide there is a little screw.  This allows you to adjust the tape guide position. It is very flexible.

I'm sure that once I master the fine features of this foot I could produce some nice looking bound seams. But I quickly abandoned this tool early in the project I was working on.

I went back to my old ways and a sense of comfort in doing things the old fashion way.

Once I stitched my seam I would press them open to get ready to attach the seam binding.  I would open up the seam binding and stitching it close to the edge of the seam following the pressed fold as my guideline.


Then I would fold it over to the other side and stitch it down. I used a store bought double fold bias tape and I have to say that I'm thrilled with how it looks.

The binder foot would save me time as I wouldn't have to stitch two lengths of the seam to achieve the bound seam. And I could have followed the pin and stitch method illustrated over at Colette Patterns or at Sewaholic. But I just felt more comfortable with this method and I didn't mind the extra time sitting at the sewing machine.

Well, I have a few more bound seams to take care of...

Happy Sewing!  


Tuesday, 21 May 2013

Progress on Burda 7304

Oh my goodness!

I wasn't sure how the gatherings were going to look on this coat. But now that I have it gathered, bound and pinned I think I love it.

Still quite of bit of work to go on this project but I just wanted to share the progress.

Off to have dinner and then a walk.

Happy Sewing!

Sunday, 19 May 2013

Unlined Coat

Spring is finally here. The apricot tree in the folks' yard is blooming with beautiful pink flowers, it is absolutely gorgeous. It is actually raining instead of snowing! And my thoughts are turning to sewing a new spring coat.

The pattern I have in mind is Burda Style 7304. It has been in my pattern stash for quite some time.

The fabric is a recent purchase. I found it in the home decor department of the local Fabricland store. It is a 100% polyester. I'm not a 100% sure how it is going to work out but I'm willing to give it a whirl because I love the print. It also have a raised texture.

I did manage to get all the pieces cut in the main fabric. Yesterday, I stopped by the fabric store to pick up some more interfacing and I came across the most perfect buttons.

I didn't get much sewing done yet as I'm still hurting with this back injury from a few weeks ago. I'm so over this, I just want to feel my old self and get back to sewing without all the mega breaks. But I have to look on the positive side. This slower pace will force me to slow down and take my time with the details of this coat.

Centre back
bound seam using binder foot
It is an unlined coat and the fabric does like to fray. My plan won't be to serge the edges, rather to use bound seams on the inside of the coat. I have purchased seam binding for this and so far I like the way it has turned out. It is not perfect. The latest June/July 2013 issue of Vogue Patterns magazine has an article "Tiny Seams Finishing Techniques for Delicate Garments" which includes instructions for the bound seam.

I cheated with the first bound seam finishing that I did on the centre back pieces. I used a binder foot. It turned out okay. It didn't seem to leave an impress that I was saving any time or made the task easier or created a perfectly straight finish.    

Sew, now I'm doing things the old fashion way. I've removed the bias tape foot and stitching it to the edge, turning it over and top-stitching it in place just like in the Vogue Patterns magazine article. I like the control that I feel I have doing it this way over using the bias tape foot. It might take more time, but that is okay with me. Besides, I think it looks better.  

Hmmm, I wonder how long it will take to finish this project?

Happy Sewing!

Stash busting: White Linen Shorts / Vogue 9191

I actually made something appropriate for the summer season and the heat.  Well, I actually did start off the month sewing a linen dress.  N...