Friday 31 January 2020

January in Review

Sewing

Top L to R:  3 cotton handkerchiefs, The Assembly Line's Tulip dress, Multi-coloured Silk scarf / headwrap, Butterfly print polyester scarf / headwrap, 
Bottom L to R:  Black and beige Silk scarf, Multi-coloured Silk scarf, Butterfly print polyester scarf, Denim shirtdress. 

In January, I managed to de-stash without adding any new fabric, patterns or supplies. Even though I was tempted by a couple of the Vogue Spring line of patterns. I held on to my pledge not to add anymore patterns to the stash. But I might have trouble with holding off on Vogue1678.  
  • 10 metres of fabric
  • 1.10 metres of basting tape
  • 1 - 55 cm invisible zipper
  • 1.5 metres of fusible interfacing
  • 2 spools of thread
  • 2 sewing machine needles
  • 2 packages of bias tape

Happy Sewing!  

Thursday 30 January 2020

Troubleshooting Thursdays: Broken Needles

In the quest to save money on sewing machine repair bills let's explore possible issues that may appear to behind a sewing machine that breaks needles.

1.  Remove obstacles. 

Don't sew over pins!  If you break a needle while sewing over a pin make sure to take the time to check under the needle plate that make no lingering parts of the needle are left behind.  And sewing over pins even if the needle doesn't break, can cause the needle end to become blunt or can bend the needle.  

2.  Incorrect needle for machine.

Make sure that you're using the correct needle for your sewing machine.  Most sewing machines can take generic (Klasse, Schmetz and Lammertz) needles.  Check your sewing machine manual if your sewing machine will only use a variety of needles.  


3.  Incorrect needle for fabric.  

Use the correct size and needle type for the fabrics you are working with, specific fabrics (leather, knits, etc.) require specific needles.  Most sewing books have a fabric - needle - thread chart that provides a general guide to follow in testing out your options.  

4.  Pulling the fabric.

Let the feed dogs guide the fabric under the presser foot to avoid putting unnecessary pressure on the needle.  If there are several layers of fabric to be guided under the presser foot consider using a walking foot.  For bulky sections in your sewing consider using a Jean-a-ma-jig to take some of the stress off the sewing machine and needle.  

5.  The needle may be incorrectly inserted.

Make certain that the needle is set all the way up against the stop when changing the needle and securing it in place.  

Previous Troubleshooting Thursday posts:


Happy Sewing!

Tuesday 28 January 2020

Hmmm, What Else Can I Hem?

Last month I tried to sew some handkerchiefs but struggled with negotiating the corners on a rolled hem on my sewing machine.  Readers offered a variety of suggestions from baby hems to mitered corners.  Before researching and trying out these suggestions (thank you!), I turned to my serger instruction book to the section on narrow hemming.  

This is the first time I changed the plate on the serger and fiddled with the dials. First. Time. Ever. I don't know why it took so long to explore some of the tricks and techniques my serger is able to accomplish. This worked out great and then I went searching for what else I could hem.  


I became a kid in a candy store as I searched my fabric stash for some silk and sheer fabrics that I have been holding on as I tried to decide on a seam finish. I was so close to hand stitching a rolled hem but the thought of rubbing medication on my wrist or having to wear a brace afterwards discouraged that thought.

The narrow hem created on the serger was perfect. And before I knew it, I finished hemming three handkerchiefs and five scarves. 


The Stats 

Fabric:  4.5 metres

Additional Tools and Supplies:  Serger, thread clippers, rolled hemming needle plate, threads and a cup of tea.  

Happy Sewing!  

Thursday 23 January 2020

Troubleshooting Thursdays: Puckered Stitches

Sewing a seam that gathers when that is not the seam you intended to sew can make you consider if it is time to call the sewing machine repair shop.  Before you throw in the towel fabric, consider checking these possibilities first. 

1.  Check for proper threading of the machine.

It can take one small skipped step in threading a sewing machine to cause seam puckering just as skipped stitches. Your sewing machine manual will have an illustrations and instructions to properly thread you machine with upper and bobbin thread.  Some machines, like my Janome QDC machine have printed illustrations on the body of machine and bobbin cover plate for easy reference.  If you picked up a previously loved machine sewing machine that didn't come with the original sewing machine manual do an online search.  

2.  Check if the sewing machine needed is compatible for the fabric.  

Generally, light weight fabrics (crepe de chine, voile, organdy, tricot) would use a size 9 or 11 needle size.  Medium weight fabrics (linens, cotton, pique, double knits) will use a 11 or 14 needle size.   Heavy weight fabrics (denim, tweed, wool coating, and upholstery) will use a 14 or 16 needle size.  There are also specialty sewing machine needles for sewing other fabrics (leather and microfibres) available at fabric shops.  Always test needle and thread options on a small piece of fabric to select the best combination before starting a project.  

3.  Check the stitch length.

If gathers is what you want, lengthen your stitch length.  To avoid gathering and puckering at the seam making your stitch denser may be the solution.  

4.  Check the presser foot pressure.  

If you're having issues with sewing a pucker free seam it could be the amount of pressure that is being applied by your presser bar.  In general, the heavier the fabric, the more pressure you will need to let the feed dog walk the fabric through.  If the pressure is too much and you're sewing light weight fabric the feed dog cause ultimately damage your fabric. Sometimes, working with certain or many layers of fabric, simply changing your sewing machine foot can help.  Hint:  a walking foot is worth it's price!  But you can also consider an adjustment to the pressure on the presser bar.  Locate the thumb screw at the top of the pressure foot lever.  By rotating the thumb screw clockwise, you will increase the pressure.  Rotate counter clockwise to decrease the pressure.  Many modern sewing machines have a pressure adjusting lever located in the inside front door that you can be easily adjusted.  Check your sewing machine manual if this is the case.  

5.  Check the needle thread tension.  

Adjusting the needle thread tension may be required for certain types of fabric.  If the bobbin appears on the upper surface of the fabric your needle thread is too tight.  Correct this by loosening the needle thread tension.  If the needle thread appears on the underside of the fabric, your needle thread is too loose.  Therefore you should tighten the needle thread tension.  Check your sewing machine manual for adjusting your needle thread tension.

6.  Check out Bunny's comment regarding straight grain vs. cross grain below.

Thanks for sharing this one!  This makes an excellent case for testing your fabric on the sewing machine before you cut out your project.  


What to check out the other Troubleshooting Thursdays posts?  You can find a link to them here:  

Happy Sewing!

Tuesday 21 January 2020

In Sewing News Today...

I woke up to a lovely article on my news feed about the new line of Canada Goose coats designed and created by Inuit designers.  This is actually 2.0, the second year that Canada Goose sponsored this initiative. 

Photo source

These original designs and wearable pieces of art will not be recreated. Instead these original designs will be traveling the globe and sold with the proceeds going back to help community through Inuit Tapiriit Kanatami.  They are currently on display in New York and will also travel to France.  Will you be checking them out?

Also on my news feed was an article on fast-fashion. The opening sentence had me shaking my head. When are journalists going to complete their research and learn that fast-fashion does NOT make "shopping for clothes more affordable?"  Could this be a case of a youthful journalist who lived in a consumer environment post-1990s when fast-fashion took hold of a new generation of consumers who were denied Home Economics education?  

Fast-fashion in itself is designed to be extremely expensive with the economic costs are hidden from consumers with the use of trims, bling and that blinding point-of-sale sticker tag.  Fast-fashion is made with man-made fibres that are not produced to withstand wear and will pill and fall apart FASTER than clothing made with natural fibres.

Fast-fashion is extremely expensive because the sewing techniques used are not those used to make the item last.  As sewists we have learned that taking the time to construct a garment well from the inside with hand-sewing techniques can make all the difference in the look and construction of the garment.

Fast-fashion is all about producing something more expensively in that it needs to be replaced because of its useable lifespan has been shortened.  The environmental impact is that these man-made fibres don't last as natural fibre clothing from our (okay my) past and they don't bio-degrade as natural fibre fabrics.  And it's getting harder to find a clothing label that has a fibre content that isn't a man-made or blend fabric.

This is even happening in the local fabric store as I notice that fabrics in the current shelves at the store do not compare to the quality of the same fabric in my deep stash purchased years ago.  Yes, I am suggesting that we're living in an era of fast-fabrics. Take linen, today you'll often find it often blended with rayon in order to cut the costs of the producers and yet the cost of linen doesn't drop, hiding the increased cost to the consumers. Signs will display the item as linen even when it is the least amount of the fibre that makes up the fabric.  Remember when the price of bacon didn't go up but the amount of bacon inside the package decreased.  Similar marketing trick. Consumers need to be aware of how items are marketed and the subtle changes impact the life-span of not only food, RTW clothing but also the sewing supplies we're sold.

In other sewing news, if you're looking for some inspiration from the Dior exhibit and have missed their tour dates in the past years, there is one more opportunity in a few months.

Well, that's all in sewing news today.

Happy Sewing!


Saturday 18 January 2020

The Perfect White Shirt

Is there such a thing?  If I were to dream, the fabric would be white and made from natural fibres. It would have long sleeves, a menswear style sleeve placket, enough ease incase there are some sweets that I can't resist, and some sort of interesting design detailing.   

{Photo source}

Something that doesn't overwhelm my petite frame with a design features that look like they're trying to hide my overweight shape.  

{Photo source}

A front drape is nice and I do like an asymmetrical hemline.  

{Photo source}

Oh, and pockets!  

But not breast pockets.  


And not an Audrey Hepburn retro look.  I would like the shoulder seam to sit at the shoulder.  Hmmm, this looks like it might be my latest sewing quest. I'll have to see what I can dig up from the pattern collection.

Happy Sewing!  

Thursday 16 January 2020

Troubleshooting Thursdays: What to Do When Your Sewing Machine's Lower Thread Breaks

Before you pick up the phone to call the sewing machine repair business, there might be a few things to check beforehand that can solve this issue.  

1.  Check to make sure that your bobbin has been properly wound

You will want to start with a empty bobbin.  Don't wind one colour of thread over another to save time.  It isn't worth the hassle if your bobbin threads unevenly.  You want to have your bobbin filled evenly across and in level layers.  If one end of the bobbin is more dense that the other side this can cause thread break issues.  

2.  Check your thread

When it comes to sewing you want to make sure that your upper thread is identical to the lower thread to achieve smooth stitches.  Of course, there are exceptions to this rule, based on specific machines (embroidery) and sewing techniques.  

Elastic thread is used in the bobbin area only to achieve shirring.  For this technique wind the elastic thread by hand until the bobbin is 2/3 full.  You can wind the bobbin by machine but if you do remember to do so at a very slow speed as not to stretch out the elastic thread.  

3.  Check if your bobbin is bent

Just like a bend needle, a bent bobbin can cause thread breaks as it will interfere with the timing of the other parts of the machine.  If your bobbin is bent, just replace it.  This also goes for any bobbin that is worn, nicked or cracked.  

4.  Check for lint built-up in the bobbin case

I can't advocate enough for frequent cleanings. I learned this lesson the hard way, I'm a convert now.  The $ I could have saved / spent on fabric instead of handing it over to the sewing machine repair shop, don't get me started!  Ideally, I like to do this at the end of a project, just before I start the next. 

Don't use canned air to clean out the lint that has accumulated in your machine.  You don't want it to blow into an area that you won't be able to reach.  Take care and time using the lint brush that came with your machine.  You can even pick up a mini vacuum found in fabric store notion departments.  

5.  Check that the bobbin is inserted correctly

Oy, how many times have I failed to insert a bobbin correctly!  I usually catch this before I start sewing as the needle won't catch the lower thread if this is the case.  In some cases if a bobbin is inserted incorrectly and depending on your bobbin case, it can cause the thread to catch on a spring or latch on the bobbin case.  

6.  Check that it's the correct bobbin for your machine

L to R:  Plastic bobbin for Janome sewing machine, medal bobbin for vintage Brother sewing machine, generic plastic bobbin sold at fabric store, bobbin case for Singer treadle sewing machine, full and empty bobbins for Singer treadle sewing machines.  

Fabric stores often sell generic bobbins that they claim with work in a variety of models but sometimes that may not be the case. If at all possible, pick up your bobbins from the sewing machine dealer.  They will carry specific types designed for your machine.  Vintage bobbins are harder to come by.  These can often be sourced from online dealers or second hand shops.  

Happy Sewing!  

Saturday 11 January 2020

In Sewing News Today...

Simplicity released their Early Spring pattern line last week, and McCall's dropped their Early Spring pattern line yesterday.  


It's all about rompers, shirtdresses and slits. 


I can't wrap my head around the thought of an Early Spring pattern line.  This is my current reality:  
A period of very cold wind chills is expected.

Overnight low temperatures will drop to near minus 30 tonight. Combined with winds of 10 km/h, extreme wind chill values of minus 40 are expected. Wind chill values will moderate Saturday. However, a longer duration cold spell looks to impact Manitoba starting early next week.
Risks are greater for young children, older adults, people with chronic illnesses, people working or exercising outdoors, and those without proper shelter.

Cover up. Frostbite can develop within minutes on exposed skin, especially with wind chill.

Extreme cold warnings are issued when very cold temperatures or wind chill creates an elevated risk to health such as frost bite and hypothermia.
There was no plug available at work to plug in the car so I took the bus.

Actually three buses.

In the cold.

I can't imagine spring when it's this cold.

Never mind an Early Spring Pattern line.

This is the only sewing pattern that has captivated my thoughts.


Needless to say, it will be a stay indoors and sew kind of weekend.

I can't bring myself to venture out in the cold.

And I'm on a "no more pattern" diet.

I'll just have to borrow the idea from the Kwik Sew pattern and make my own full-back length heating pad to warm myself up.

Spring sewing will have to wait.

Need to get through this season first.

Happy Sewing!  

Thursday 9 January 2020

Troubleshooting Thursdays: What to Do When Your Sewing Machine Breaks the Upper Thread

Continuing on the Troubleshooting Thursdays series, this week we'll look at possible causes associated with the sewing machine that breaks upper thread.  Sometimes it can be an easy fix that could save us on a repair job.  

1.  Check the threading of the machine.  

Start with the spool of thread that you're using and see if the thread is stuck in the slit cut into the side of the spool top.  


Some sewing machines allow you to thread the machine with the spool sitting tall.  Other machines might be designed for the spools to be inserted sideways.  In this case use a thread cap large enough to allow the thread easily unwind from the spool.  


2.  Check the needle.  

If the needle is in backwards this can also cause your sewing machine's upper thread to break.  The flat side of the needle should face the back.  Another needle issue that can cause concern is if the needle is bend.  To check, roll the needle on a flat surface.  If the needle is bent it will need to be replaced.  

3.  Check the upper tension.  

Your sewing machine manual will have a section on checking and adjusting the amount of pull the thread as it feeds through your sewing machine.  

4.  Is there lint lingering?  

Remove the throat plate and check the bobbin case area for excess lint or fragments of old threads that need to be cleaned out.


The upper thread can get tangled and break in this area. Ideally, after finishing a project, that is when I like to clear out any lint and broken threads that might be lingering in this area to keep things running smoothly.   

5.  Cheap thread is not worth it.  

Knotty, cheap and even old thread could be your culprit.  I can't stress enough that trying to save a few cents on thread might not be worth the headaches and could cost you in the end via a sewing machine repair bill.  I discovered this little fact the hard way with my serger.  Take the time to check the quality of your thread before making a selection.  Most spools of thread can be examined in the store before you purchase it.  Take this time to check if the strand of thread is knotty or has a fuzzy surface when held up to a light.  Now compare it to a higher quality thread, it shouldn't share these characteristics.  

Happy Sewing!  


Sunday 5 January 2020

The Tulip Dress by The Assembly Line

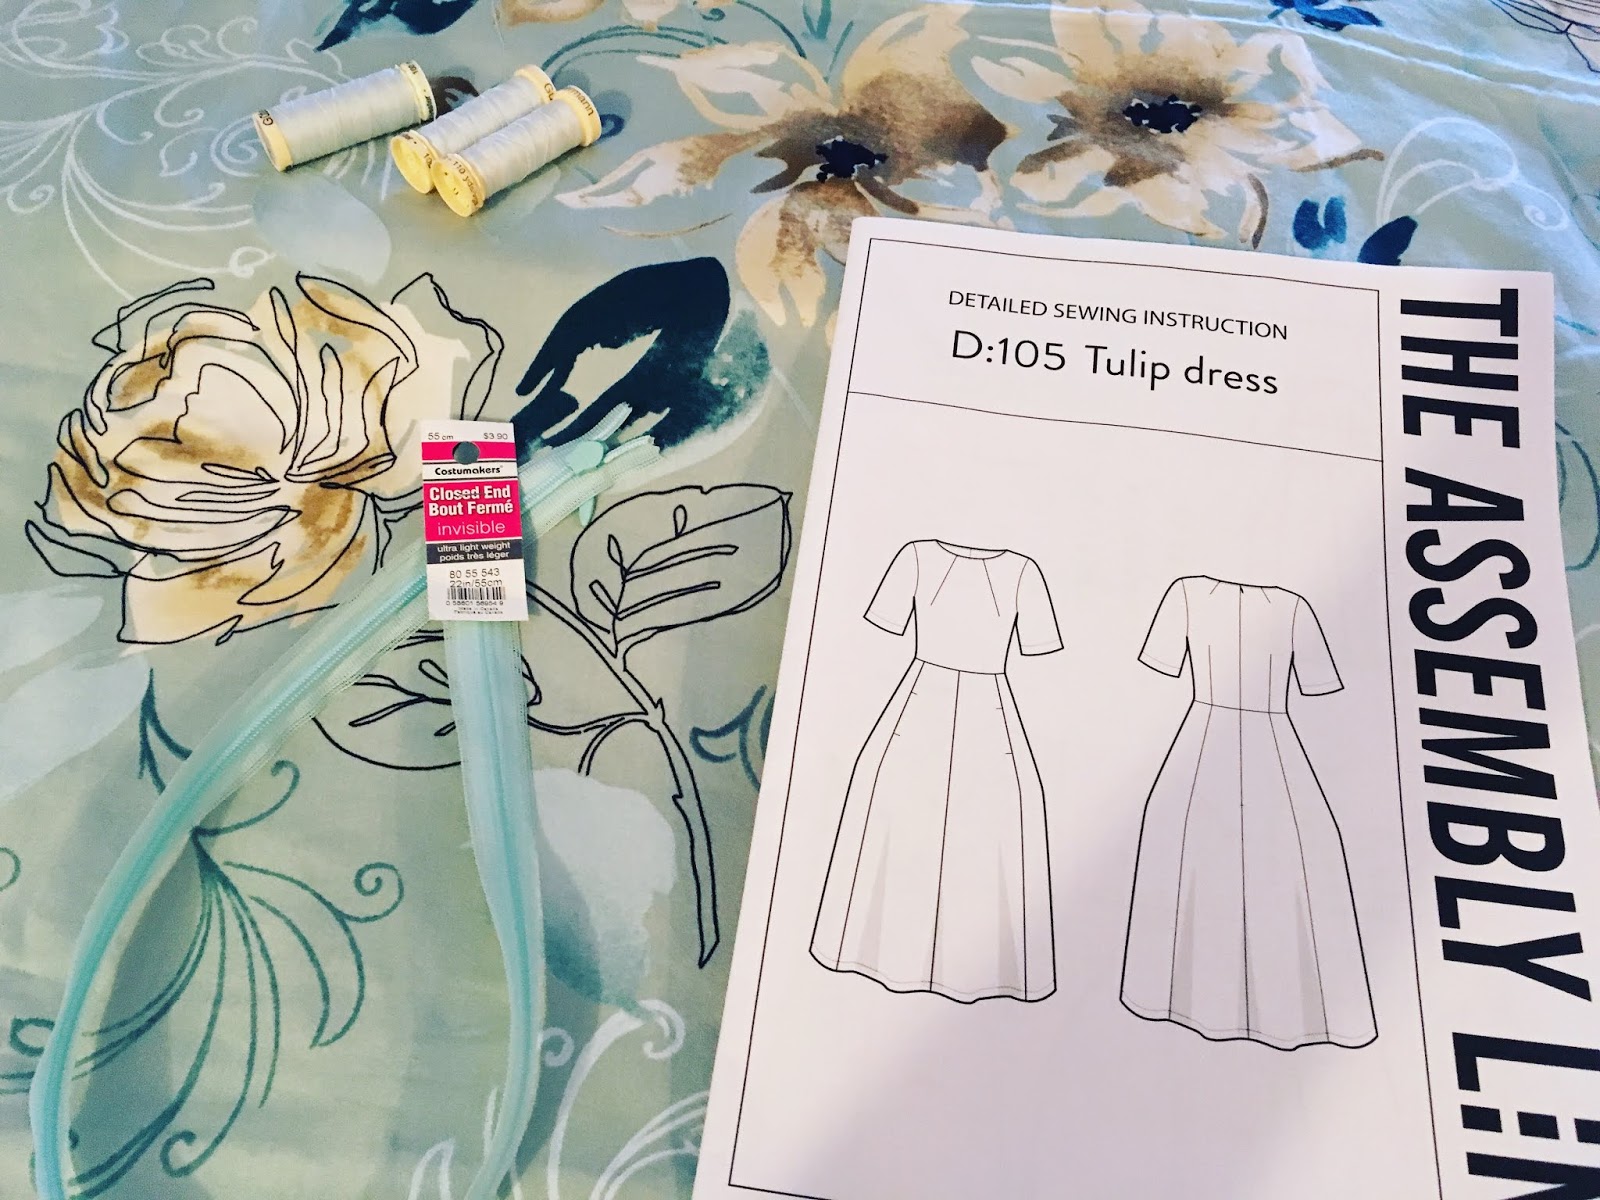
The Assembly Line is a new-to-me pattern line out of Sweden. I stumbled across the Tulip dress pattern one day over at Etsy and it is was then that I researched this pattern line. They have some nice designs. I do recommend that you take a look if you're not familiar with this line.  This is my wearable toile.


The Pattern: 

I have to say, this is an extremely well drafted pattern. I had no problem with finding my size according to the pattern measurements. I will admit that I was worried for a moment about the fullness of the skirt, it was all for nothing. Everything came together without any issues.  


I cut a size medium for the sleeves and the upper portion of the bodice and dart placements.  The sides were graded from a medium at the underarm point / upper side of the bodice to a large at the waistline.  The skirt pieces were cut as a size large.  I shortened the length by four inches only to wish that I had another inch to an inch and a half. The length is still nice, just a personal preference and note for next time.  

The pockets were raised so that they sat two inches below the waistline seam. If I sewed them where they were marked to be sewn I wouldn't be able to reach the pockets. 

The instructions are well written and suitable for a beginner. I did, however, change how I constructed the dress from that of the instructions.  I preferred sewing the sleeve flat, used bias tape to finish the hems and neckline.  It is suggested to use interfacing stripes for the pockets and at the zipper opening but I passed that suggestion up and used basting tape for installing the zipper. This came in handy when negotiating the curves on the skirt back.  

This is my first pattern where the seam allowances were in metric and much narrower than North American commercial patterns.  The instructions suggest serging the edges before sewing the seams and this is why.  

Let me finish by saying this pattern is worth every penny spent. It's comfortable, so comfortable, love the look of those darts from the neckline in the front and any dress pattern that comes with pockets is a win. I'll be prepping my good fabric soon for the next version, in the meantime, I'll be wearing this toile.  

The Fabric & Notions: 

This 100% cotton fabric was found in the fabric stash, a home décor find when it made it's way to the discounted section. It's a medium weight cotton that was pretreated with a tumble in the washing machine, followed by the dryer and then a steam pressing before hitting the cutting table.  

I mentioned that the neckline and hems were finished with seam binding. The skirt hem alone took a package! This was sourced from the stash, left over from this project. The 22" (55 cm) invisible zipper and all the thread used were also found in the stash.   


The Stats:

Fabric:  3 metres

Basting tape:  1.10 metres

Seam Binding:  2 packages

Zipper:  22" invisible

Pattern:  D:105 The Tulip Dress

Additional Tools and Supplies:  Scissors, pins, cutting table, thread clippers, iron, ironing board, sleeve ham, pin cushions, sewing machine, walking foot, regular presser foot, invisible zipper foot, regular zipper foot, threads for the sewing machine and serger, serger, new sewing machine needle (don't sew over pins!), screwdriver, tailor's chalk, tracing paper, felt markers, measuring tape, measuring gauge, ruler, and chai tea.  

Happy Sewing!

Friday 3 January 2020

Shirtdress: Vogues 1503, 8934 and McCall's 7546

The first project to be completed this year is a revisit of two shirt patterns, out-of-print (OOP) McCall's 7546, Vogue 1503 and a coat pattern, Vogue 8934, used to create a shirtdress.


The Patterns:  


Vogue 1503 was previously made as it was designed and it is the sleeve with the placket that has since become a go-to pattern piece.


I switched these along with the cuff pattern pieces to be used with the shirt front, back, facing and collar pieces from McCall's 7546.  McCall's 7546 has never been used as a shirt pattern as designed but it is the forth time that I've extended view D to create a shirtdress. One day I do plan on making the shirt. I threw in the pocket pattern piece from OOP Vogue 8934 for some inseam pockets. The only change from the last version was that the hemline is an inch shorter due to the yardage available. Even though I presently have two versions of this shirtdress in my closet, this is a welcome addition. It's comfortable and I know I'll wear it often.

The Materials:  

The fabric is a fabulous stretch denim from the stash (previously from Mitchell Fabrics). I originally picked up 2.5 metres years ago with the intention of using it for OOP McCall's 7352 but when the toile didn't work out for the jumper I abandoned that plan.  It wasn't until I thought it might work for The Assembly Line's Tulip dress that I searched for it only to realize after pre-treating the fabric that I didn't have quite enough yardage to make it work. But there was enough for this project and that is how another shirtdress came to be.


The denim was pre-treated with a tumble in the washing machine, followed by the dryer.  There was no need for pressing before cutting the fabric.  And for this reason, it will likely become my favourite. All of the notions used for this project came from the stash including the buttons.  


The Stats:  

Fabric:  2.5 metres stretch denim

Interfacing:  1.5 metres fusible

Buttons:  11 - 12 mm (1/2") 

Patterns:  McCall's 7546, Vogue 1503 and Vogue 8934

Additional Tools & Supplies:  Cutting table, iron, ironing board, seam ripper, measuring tape, rulers, measuring gauge, tailor's chalk, pins, sewing machine, walking foot, buttonhole foot, scissors, thread clippers, cotton thread for the sewing machine, serger, polyester threads for the serger, buttonhole cutter, cutting board, hammer, hand sewing needle, thimble, wrist brace, tailor's wax and tea.  

Happy Sewing!  

Thursday 2 January 2020

Troubleshooting Thursdays: Skipped Stitches

What do you do if your sewing machine has been skipping stitches?  Do you call up your local sewing machine dealer to book an appointment to get your machine serviced?  Or do you get to work at solving the problem yourself?  There are hundreds of models of sewing machines out there all with different bells and whistles.  Essentially, sewing machines, no matter their differences, are basically similar with a precisely timed movement of the needle and shuttle hook to manipulate the top and bottom thread therefore creating a stitch.  Sometimes, when skipped stitches occur, it can be a simple fix.  Here are a few things to check before you reach out to your sewing machine repair person.  

1.  Check to see that the sewing machine needle has been correctly inserted.  

If you look closely at your sewing machine needle, generally speaking, you will notice that there is a flat side and a side that has a groove.  The flat side of the needle will always face the back.  If you have a round needle, the groove of the needle will face the front of the machine.  Make sure that you push the needle up until it stops before tightening the screw to hold the needle in place.  A needle that is not all the way up in the holder can also result in skipped stitches.  

2.  Check if the needle is bent. 

Have you ever heard that you should never sew over pins?  This is one of the reasons why.  A needle that is bent it can be the reason behind those skipped stitches.  To test if this might be the issue, remove the needle and lay it on a flat surface and roll the needle over.  If the needle doesn't roll true this may be the issue and it's time to change it.

Of course, there are other situations that could cause a needle to bend.  A presser foot that struggles over a increased or decrease in bulk can cause a needle to bend.  Using a Jean-a-ma-Jig can aid with getting over the bulk without putting stress on the needle.  

3.  Check if the needle point is blunt.

Does the needle make a popping sound when it goes through the fabric?   This is a sign that the needle point is blunt and requires changing.  

4.  Compatibility of the needle and thread.  

If your needle eye is too small and the thread you plan to use is thicker this could be the cause of your skipped stitches.  If you are sewing denim, look for a sewing machine needle designed for this type of thread and fabric. Test your needle and thread on a small sample of fabric to make sure they are compatible.  Just like quality of fabric can influence the quality of your project, same goes for thread.  

5.  Check for proper threading of the machine.  

It can only take one missed step in the threading order to cause skipped stitching.  Sewing machine manuals come with an illustrated order of threading your machine.  As a general rule, exception being sewing with denim or embroidery stitching, it is best to use the same thread in the upper and bobbin threading systems.  Make sure your bobbin is inserted correctly, 

6.  Check the sewing machine manual for recommended needles.  

With all the fancy bells and whistles that sewing machines come equipped with, a specialized sewing machine may require a specific needle to work at optimal performance.  Even though most machines can use a generic needle, keep in mind that not all needles are created equal.  Pick your sewing machine needle according to the fabric you will be sewing.  Check your sewing machine manual for this type of information.   

7.  It could be time for a needle change.  

Over time a sewing machine needle can dull even if it hasn't reached the point of becoming blunt or bent.  As a rule, I change my sewing machine needles after about eight hours of actual sewing, the time when I clean out the lint that eventually accumulates under the plate.  An accumulation of lint can also play a role in skipped stitches.

Happy Sewing!

Cotton Summer Dress: Butterick 6784

Ever since I made this version of Butterick 6784 last summer, I was smitten over this kAtheRine Tilton design with its Lagenlook vibe.  I ...