Tuesday, 31 August 2021

August in Review...

August, where did you disappear to so quickly?  This has been a crazy summer.  Restrictions lifted and then reinstated.  Mask mandates lifted to elevated anxiety levels as news reports of the Delta variant taking hold in neighboring regions, only to be reinstated.  Anti-masker and anti-vaxxer protesters turning the election campaign into one ugly scene reminiscent of what we thought of as American style politics only to be awaken to the fact that it's Canadian style ugly politics as well.  Anti-vaxxers stuffing neighborhood mailboxes with pages and pages of doomsday predictions.   

Actually, I'm happy to see August move into distant memory and I shutter to think what the final half of the election will bring.  There is so much hatred and anger displayed in the news, in what seems to be about pandemic restrictions and mask mandates.  I long for kindness and a world where kindness was the norm.  I'm sick of debating about the good of wearing a face mask.  Or watching a volunteer at a hospital or employee at a store take abuse from someone spewing their angry distaste for precautions we're asked to take.  I long to bear witness to kindness.   


I long to be sewing things that bring me joy.  These projects brought me some joy.  Sewing joyful colours were just what I needed this month.  


Output

Fabric:  10 metres (August) + 44.2 metres (previous months) + 1 recycled skirt = 54.2 metres + 1 recycled skirt.  

Zippers:  0 (August) + 1 - 20 cm regular zipper and 1 - 55 cm invisible zipper (previous months) = 2

Buttons:  12 (August) + 23 (previous months) = 35 

Seam binding:  0 metres (August) + 10 metres (previous months) = 10 metres

Knit 'N Stable Tape:  0 metres (August) + 9.5 metres (previous months) = 9.5 metres

Elastic:  1 metres (August) + 13 metre (previous months) = 14 metres

Twill Tape:  0 metres (August) + 0.5 metres (previous months = 0.5 metres

Spools of Thread:  1 - 100 metres spool (August) + 3 900 metres (previous months) = 4 K metres

Sewing Machine Needles:  0 (August) + 5 (previous months = 5

Hand Sewing Needles:  0 (August) + 1 (previous months) = 1

Sewing Label:  0 (August) + 1 (previous months) = 1


Input

Fabric:  2.3 metres (August) + 52.3 metres (previous months) = 54.6 metres

Sewing machine needles:  0 (August) + 3 (previous months) = 3

Buttons:  0 (August) + 10 (previous months) = 10

Sewing patterns:  1 (August) + 6 (previous months) = 7

Seam binding:  1 package / 3 metres (August) = 3 metres

Stay Safe, Be Kind & Happy Sewing!  


Wednesday, 25 August 2021

The Next Project: But First, A Bit of History


Ahhh, the humble denim jacket is often mistaken as an All-American classic but it isn't so.  The denim jacket has a shared global history.  According to Dan Ketchum's piece, "The History of the Denim Jackets," denim blue jeans trace their history back to 1860 Italy.  

Levi Strauss is often created for designing denim blue jeans but it wasn't until the 1870s that his dry goods company started making heavy duty work pants.  A garment already created back as "part of the uniform of Giuseppe Garibaldi's army" back in Italy a decade earlier (Ketchum).  And as they say, the rest is history.  Okay, not quite... 

Levi Strauss was born in Germany in 1829 and came to America in 1847 where he worked with his brothers in New York where they had a dry goods company.  A year later and elsewhere in the country opportunity was calling.  The California Gold Rush caused a significant population increase to the western coast of the United States as many sought their fortune.  Strauss, being one of them, relocated in 1853 to San Francisco to establish his own dry goods company and sell his goods to a thriving mining industry.  And being the successful businessman that he was, Strauss introduced the denim work clothes to the influx of gold prospectors coming to California.  

Levi Strauss didn't invent denim work clothes but he certainly deserves credit for marketing denim to miners and propelling it to iconic status to the masses globally.  Today, the brand that bears his name is worth $10.88 billion (USD).  

And today, there are many brands and clothing manufacturers creating denim pieces.  Sadly, with the rise of fast-fashion there are ill-fitting and less than desirable knock-offs.  Thankfully, home sewists, like myself, can skip the fast-fashion trends and have fun creating their own denim jacket that fits well and in 100% cotton with out the man-made fibre additions 

So where to start?  Well, the pattern of course!  There are so many options to chose.  Here are just a few:  


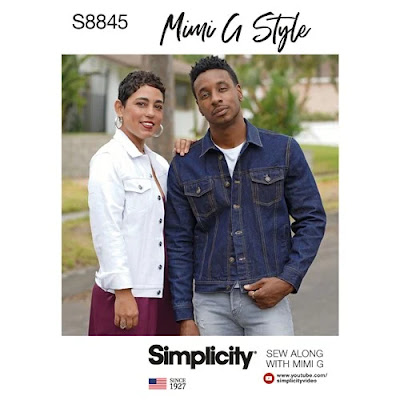
I do like the classic seams on Mimi G's denim jacket pattern, Simplicity 8845.  Added bonus the pockets and this is a unisex pattern. 


Jalie patterns offers a PDF version of the iconic jean jacket.  It is currently out-of-print but still available as a downloadable.  


Style Arc offers the Stacie Jean Jacket in both PDF and printed versions.  

Butterick 5616 offers a jean jacket and denim shirt style pattern.  

And these are just a few jean jacket style jackets out there.  Over the decades, there have been many more, many now out-of-print (OOP), but still available over at Etsy or Ebay if you are interested in checking out other options.  

For my own jean jacket, I'm going to give OOP Butterick 6376 a try.  How about you, have you made a jean jacket?  

Stay Safe and Happy Sewing!

Tuesday, 24 August 2021

Matching Pajama Top: Butterick 6296


Sewing around here has been a s-s-s-l-l-l-l-o-o-w-w-w-w process.  Would you believe it took over two weeks to finish this top since sewing the matching pajama pants?  Free time has been on short supply lately.  


There is not much more to say about sewing this project that I haven't already said in previous makes using Butterick 6296.  I did shorten the hem length 1 1/2 inches from the last version.  And I added an extended back neck facing.  Otherwise, no new changes.  

The 100% cotton fabric is pure awesomeness and makes me feel happy.  These might not be the warmest pair of pj's I have but they are a current favourite.  The fabric was pre-treated before hitting the cutting table.  


Project Details

Seams:  2.2 to 2.8 straight stitch lengths

Seam Finish:  Serged

Fabric:  2.5 metres

Interfacing:  1 metres

Buttons:  4 - 5/8" recycled buttons

Pattern:  Butterick 6296

Additional Tools and Supplies:   Cutting table, pins, pin cushions, scissors, thread clippers, seam ripper, sewing machine, buttonhole foot, buttonhole cutter, cutting board, hammer, serger, threads, hand sewing needle, tailor's wax, thimble and coffee.  

Stay Safe and Happy Sewing!

Wednesday, 18 August 2021

Make Do and Mend: Extending the Life of Wool Socks

Well, I could replace my wool socks or mend them and put the money towards groceries and gasoline.  Since I'm not over the sticker shock of the price of buttons, let alone the price of celery, I opted to mend.  


I cut up a wool cardigan sweater that accidently shrunk over a year ago and made patches for the heels of my wool socks.  A little hand stitching while the sock was fitted over a light bulb and it was good as new.  I have a couple more pairs of socks that can use some TLC, hopefully over the weekend.  

Stay Safe and Happy Sewing!

Saturday, 7 August 2021

Is it Faux or Authentic Ankara Fabric: OOP Vogue 9217

I love the bright joyful colours found in Ankara print fabrics.  I especially love that the colours are saturated on both sides.  And then throw in the colour orange into the mix and I'm over-the-moon smitten. 
 
"Orange is the happiest colour."
~Frank Sinatra  


To be completely honest I'm not sure if this is a faux or authentic Ankara Fabric.  The colour and pattern is saturated on both sides. It could be authentic. But according to a post at African Fashion Law, an authentic Ankara print fabric would "indicate the type of fabric / product and registration number on the selvage."  There is no such markings on the selvage.  So, it could very well be a faux Ankara fabric.  

All I know for certain is that when wet it doesn't lose it's dye and that the bolt of fabric stated that it's a 100% cotton.  I found this fabric at Northwest / Marshall Fabrics, a place that is notorious for not having the most detailed fabric labels.  I just couldn't resist the vibrant colours and the fact that it was on sale at 50% off.  

My plan, as you can tell from the above photo, is to make a sleepwear set after spotting other similar pajama sets online.  


So far, I've managed to sew up the pajama bottoms.  Sewing only happens in short little spurts around here lately.  I'll take whatever free time I can get at the sewing machine now-a-days. But I digress... 

I don't know what to say about this project that I haven't already said before with previous projects.  Even though this design isn't advertised as a pajama set, it is comfortable enough for the job.  Really, these pajama pants are all about the fabric.  


I was working with a cotton that was thinner than the previous fabrics I used for pajama bottoms.  And considering that I recently had to mend the interior waistband of my flannel bottoms, I thought to interface the waistband.  I used a non-fusible interfacing for this job. The fabric was pretreated with a tumble in the washing machine and dryer followed by a steam pressing.  \

Now, just to get to work on the matching pajama top.  


Project Details

Seams:  2.2 to 2.8 straight stitching

Seam Finish:  Serged

Fabric:  2.5 metres

Elastic:  0.8 metres - 1"

Pattern:  OOP Vogue 9217

Additional Tools and Supplies:  Cutting table, scissors, pins, pin cushion, measuring tape, measuring gauge, tweezers, iron, ironing board, safety pins, sewing machine, serger, threads, hand sewing needle, thimble and many breaks.  

Stay Safe and Happy Sewing!

Thursday, 5 August 2021

Wee Little Dress: OOP McCall's 8548

This beautiful piece of cotton plaid seersucker has been in my stash since the spring of 2017 waiting for the perfect project.  I picked up the last 2 metres at the time.  


The perfect project happened to be a little wee dress, size 2, and matching sunhat.  The sunhat still has to be stitched up, maybe this weekend.  Even though there is not much of the summer left, I do hope that it will have a chance to be worn.  Little ones do tend to grow out of things quicker than you can sew them.  


This is the third time I've sewn the dress from this out-of-print (OOP) pattern, circa 1996.  The first time was over twenty years ago.  I stumbled across another uncut copy of the pattern a few years ago and this spring I revisited the dress pattern.  It's a great pattern and if you can find a copy, I do recommend picking it up.  


I did stray from the well-written pattern instructions just a bit.  There wasn't enough fabric to cut the binding for the sleeve if I wanted to cut out the hat pattern as well.  And there was no matching seam binding in my stash.  Top that off with the crazy pandemic-blamed mark ups on sewing notions, I went on a scavenger hunt for an alternative.  That is when I came across a left-over piece of this ribbon which just happened to be enough for the job.  


As it turned out, it happens to be my favourite detail on the dress.  Although, that Peter Pan collar is pretty cute too.  Using the back bodice pattern piece as a guide, I cut out a back neck facing.  Otherwise there were no other changes to the design.  


Project Details

Seams:  2.6 straight stitch

Seam Finish:  Serged

Fabric:  2 metres (narrow width)

Ribbon:  0.5 metres

Buttons:  8 recycled

Pattern:  OOP McCall's 8548

Additional Tools and Supplies:  Cutting table, pins, pin cushions, tailor's chalk, measuring tape, measuring gauge, scissors, sewing machine, buttonhole foot, threads, serger, seam ripper, buttonhole cutter, cutting board, clapper (I couldn't find my small hammer), hand sewing needle, iron, ironing board, thread clippers and many breaks to nurse a sore back these past few days.  

Stay Safe and Happy Sewing!

Monday, 2 August 2021

Home Décor Sewing: New Kitchen Curtains


This is a project that has been waiting in queue for a very long time.  More than a year for sure.  Part lost sewing mojo, part dislike of sewing home décor projects and then it finally got to the point where I just needed to get it done.  

During the quiet of the morning, the sewing table was cleared and the meticulous cutting started.  The thread was changed one the serger and sewing machine and then it was straight stitching.  Easy, I know.  So why the dislike of home décor sewing?  Perhaps it is that there is no hiding mistakes once they are hung at the window.  I'm not sure if there are any mistakes in my measuring and cutting.  I sure hope not.  Right now, I'm just going to celebrate that these are done and keep my fingers crossed that the measurements are a precise as I dreamt.  


Project Details

Seams:  2.8 straight stitch

Seam Finish:  Serged

Fabric:  3 metres

Additional Tools and Supplies:  Cutting table, clappers, scissors, measuring tape, measuring gauge, sewing machine, serger, threads, thread clippers, iron, ironing board, tweezers and a cup of Earl Grey tea.  

Happy Sewing!


National Dress Up Your Pet Day!

Five years ago I wrote a blog post on National Dress Up Your Pet Day and I started off with how "the pet market for pet products and s...