The last few days I've been taking care of the front to side and side to back seams along with darts. There are two sets of darts, one at the shoulder seam and another at the back neckline. Simple stuff really.

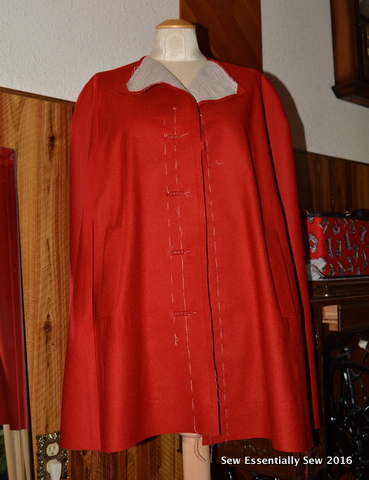
Nothing really worth dedicating a chapter to but I thought you might like to see how the cape looks at this point.

It is no where done but it feels great to slip it over my shoulders and slide my hands into the pockets. But enough of playing dress-up, there's still a lot of work to do. Let's take a look at the next new-to-me technique involved in this cape.
The vintage Simplicity pattern that I am working on has one short sentence stating, "[s]ew with padding stitches." End of sentence. There are no glossary terms or explanation of padding stitches to be found anywhere on the instruction sheet.
My education on this new-to-me technique began with a pile of books. I'm ol' school like that, preferring to do traditional research over watching videos. And I would have guessed that the greatest wealth of information would be found in the vintage sewing books but really I found some words of wisdom from a variety of sources.
Sew A Fine Seam by Violet I. Wilson, copyright 1955, offers some pointers that I found helpful. There are not a lot of illustrations to go with the detailed descriptions.
- The stitch is taken at the right angles to the marked line about 1/4 inch apart.
- Check for 1/4" variance on collar pieces.
- Keep the threads slack.
Another wealth of information came from The Sewtionary by Tasia St. Germaine. This book offers colour pictures and tips that I found helpful.
- Use silk thread to pass through the hair canvas with ease and to limit impressions in the fabric.
- Wrap the undercover around a tailor's ham to steam to shape the collar after it has been pad stitched and leave it overnight to dry.
Vogue Sewing, circa 1980, provided some important information about determining the roll not only on the under collar but on lapel as well. Unlike the Kate Spade cape my vintage Simplicity pattern does have a label. Vogue Sewing continues with a wealth of information on how to stabilize the roll as well. It was the time that I spent reading these key pages in Vogue Sewing that made me decide to go back and pad stitch the label as well.
The geek that I am was quite interested in the information found in the Reader's Digest Complete Guide to Sewing, circa 1978, where I discovered two new terms relating to the padding stitch. There are the Chevron padding stitch and the parallel padding stitch. Most books illustrate the Chevron padding stitch where each row of stitches are in the opposite direction so that they appear as a herringbone weave. The Parallel padding stitch are made when each row of stitches are in the same direction.
So how did it turn out?


Right now the under collar is currently drying on the tailor's ham as I go back and pad stitch the label.

Until the next chapter, happy sewing!


Right now the under collar is currently drying on the tailor's ham as I go back and pad stitch the label.

Until the next chapter, happy sewing!


Today, this is the 2nd post that I read about a red cape and it is inspiring me to sew my own cape. Nice work so far.
ReplyDeleteThanks!
Delete