Tuesday, 31 March 2015

March in Review...

Sewing

Most of my time earlier this month was spent working on the spring coat. Wait, I should correct myself here.  Most of my time this month was spent with my seam ripper and taking out stitches on my spring coat. In an attempt to keep my spirits up, I stitched up a few simple projects.  


Not bad for a month worth of sewing that started off where I felt under the weather and ended wearing a wrist brace.  

RTW Fast

I fell off the wagon again when I found a pair of exercise pants that fit. I have several patterns for exercise outfits but they are in sizes too small. That's my excuse and I'm sticking to it. I can admit that this year I'm a bad RTW faster. And I picked up some undies too.  

The Stats

I was also bad when it came to adding to my stash--both patterns and fabric. I have a lot of sewing to do if I'm going to put a dent in my list-of-things-to-do.  

Sewing Supplies
Used from Stash
Additions to the stash
Basting Tape
1.47 metres

Bias Tape


Buttons


Chain

1.3 metres
Elastic


Fabric
19.95 metres
27.9 metres
Interfacing
0.35 metres

Lace


Lining


Needles


Hooks and Eyes


Pattern
2 previously used
7 new
14
Ribbon

7 metres
Serger Thread


Sewing Machine Needle
2

Snaps


Spools of Thread
2
3
Velcro


Zipper
1 - 22” invisible
1 - 7”  invisible
1 - 8" invisible
1 - 18" zipper
1 - 8" invisible
  
ItemsTotals-to-date
Tops
2
Pants
0
Dresses
4
Sweaters
0
Coats
0
Jackets
0
Skirts
2
Hats
0

Sunday, 29 March 2015

It's here!

Call it what you like, work lay-off, sew-cation, spring break. It's here.

{Source}
It is finally here. The snow is almost all gone. The days are getting longer. Temperatures are hitting the plus digits. We're exposed to more sunshine, glorious sunshine that makes hand-stitching pleasurable. I was so looking forward to spring break.


There were plans, grand plans. Finish the Sybil Connolly spring coat and start on the Isaac Mizrahi top after I stitched those chemo caps. And then clear off the cutting table and cut out that wrap dress... Oh the plans!


And then this happened. Yup, that is my right hand in a brace along with two weeks worth of anti-inflammatory meds. Nothing too serious [fingers crossed on my left hand], just a tendon issue and orders to rest it. But sew much for my sew-cation. 

The up side of the brace is that I can now drive and turn the key in the ignition without the pain reminding me to use my left hand for those simple tasks. 


Which was great because I was able to get to the bookstore where I found this, Gods and Kings:  The Rise and Fall of Alexander McQueen and John Galliano.  I haven't yet finished The Lost Art of Dress (my bookshelf is very much like my sewing table--lots on the go!) but I think this latest book will help take my mind off the lack of activity going on in the sewing room. I can't wait to dive into it!   

How about you, what are you reading and sewing?  

Happy Sewing!  


Friday, 27 March 2015

Perplexed by Pantyhoses

So what do you think about pantyhose?

{Source}

I ask this question because a funny thing happened at work yesterday. A little gal snuck up behind me, bend down and touch my leg and then ran off. I was perplexed by what could have caused this behaviour. But then realized that the only difference in my appearance was that I was wearing pantyhose with a skirt after a long winter of ski-pants, wool pants or fleece lined tights. The little gal was probably equally perplexed by this new look to my leg.

When I retold this story to one of my co-workers she exclaimed, "pantyhose are gross!"

Let's just say there is quite a big age gap between us. I happen to like wearing dresses and skirts. And yes, pantyhose too. I never would have considered them "gross" but her comment and what happened earlier in the day did make me think about the shrinking hosiery department in the retail landscape.  

Linda Przybyszewski in her book The Lost Art of Dress points out that in 1959 pantyhose came onto the fashion scene liberating women from wearing girdles to hold up stockings. But it took the rise of the hemlines in the 1960s for pantyhose to skyrocket as the preferred hosiery choice.

McCall's 7915: 1960's stockings pattern
{Source:  Etsy)
Przybyszewski states, "[b]y 1970, pantyhoses made up 70% of the hosiery market." Hosiery doesn't command the same value in retail as it did in the past. I recall hosiery departments of the past occupying greater retail space and salient positions than they currently do.

Could the decline of pantyhose in the retail market have something to do with the popularity of the maxi-dress or is it a generational revolt? What do you think? Have you ever made your own stockings, tights or pantyhose?

Happy sewing!


Tuesday, 24 March 2015

Knit Lace Tee-shirt

Stash-busting 2015:  Vogue 8524


Fabric:                  1 metre knit fabric @ $5.65 ($10.00/metre - 50% off + taxes)

Pattern:                 Vogue 8534 @ $10.29 (5.99 + taxes + shipping)

Sewn On:              Janome 4120QDC using a regular presser foot for knit stitching, walking foot for the twin needle hem.

Seam Finish:        Serged on a Janome My Lock serger.

Let me say that I love everything about this pattern and I am thrilled with how this top turned out! And to be completely honest, I don't know why it has taken me so long to make up this easy tee-shirt. From cutting to stitching you can whip this top up in no time.  

Vogue 8534: pre-hemmed

Let's talk about this fabric!  

I only picked up a metre piece of this fabric because it was the only piece found in this bin of texturized knits. I fell for the lace-y texture of this knit and I had no idea what I would do with it when I bought it. I actually had it set aside for one of the chemo caps but changed my mind when the need for a top to go with the skirt came up. I'm so glad that I was able to squeeze out a top from this piece of fabric. Although, it would have made a cute cap too.   

Now, let's talk about the pattern, Vogue 8534. It is an out-of-print pattern but you still can find it on the Vogue website in the out-of-print section but keep in mind that it may not be available for much longer. I made version A with the front pleats (love) and the kimono style sleeves (also love). Actually, there are no dislikes about this pattern. Absolutely, none.  

Some people over at Pattern Review expressed a dislike for the unfinished neckline but I actually don't mind it. I guess because my knit is stable enough to keep its shape in that area. I just serged the area and left it. I think if I were to make this top in a knit with more drape I would add a seam allowance and neck facing. But I like the way it looks here in this fabric.   


I took my time with the hem finish though. I shortened the pattern length by one inch when I cut out my fabric and then shortened it another two inches after I tried it on. I still had enough length to hem it up an inch. The sleeves are supposed to be hemmed up 5/8" inch but I didn't want to do a rolled hem as illustrated in the pattern instructions, so I just finished it off with twin needle stitching as the bottom hem.  


If you stumble across this pattern I would say get it! It made a comfortable top that I'm sure I will get a lot of wear out of this spring and summer.

Total cost of basic materials for this awesome tee-shirt is $15.94.

Happy Sewing!


Monday, 23 March 2015

Burda Skirt

Stash-busting 2015:  New Spring Skirt

Fabric:                  1.55 metres cotton fabric with decorative ribbon design @ $8.76 ($5.00/metre + taxes)

Zipper:                  8 inch invisible zipper @ $1.36 ($2.40 @ 50% off + taxes)

Pattern:                 Burda 6766 @ $7.62 ($8.99 - 25% off + taxes)

Basting Tape:     0.35 metres @ 0.34 ($0.98/metre)

Sewn On:              Janome 4120QDC using a regular presser foot for straight stitching, invisible zipper foot for the zipper and blind hem foot for the hem.

Seam Finish:        Serged on a Janome My Lock serger.

Hand-stitching:  Slip-stitched the inside of the waistband.


This fabric has been in my stash for more decades than I care to remember at this moment. Yes, I do believe that it has been in my stash for that long. I held onto this piece of fabric this long trying to decide on what to do with it and then I spotted Burda 6766! I really wanted to showcase the decorative trim sewn onto this 100% cotton fabric and felt that something without too many seams would work best.

The pattern has no front seam and waistband and a back piece. Three easy pieces. What was not so easy is trying to figure out my size in a Burda pattern. Am I the only one in North America that is struggling with converting to European sizing? I'm a straight size 14 with Vogue patterns. Burda patterns not so.

According to the pattern measurement chart, it suggests to cut the skirt according to my hip measurement. Size 20 according to the measurement chart. I did this and I'm happy with the generous amount of ease around my hips. But the fit at the waist was off--way off. The large waist on the skirt was even too big for the size 20 waistband.

I tried to fix this issue by taking in the side seams and tapering down five inches below the waist edge. I was then able to sew the waistband in place but the waist still fits big on me. I can easily take it in a another inch. That said this skirt as is would work for those bloated days. I'm trying to lose weight so I can see this skirt ending up on the cutting table again.

I can see myself (positive visualization here) taking it from the centre back seam and re-inserting the invisible zipper. I know it sounds like a lot of work by by tackling the alterations from the centre back seam I will be able to fix the placement of the back darts which are way off as a size 20 dart.   


Although I personally had fitting issues with this pattern, I wouldn't discourage anyone from giving this pattern a try. It is a great basic pattern and I will try it out again just at a smaller size and another dart placement in the back. Love the longer length and the option to add a decorative hemline finish.

Total cost for basic materials to make the skirt came to $18.08. And it is a unique skirt that I wouldn't see duplicated when walking down the street. Sweet. Sometimes there is a benefit to holding onto to fabric for awhile.  

Happy Sewing!


Update:  The skirt has been altered and now fits beautifully. I had to add another zipper when the one that I removed broke. This added another $2.07 to the materials (zipper and basting tape) making the new revised cost $20.15, still a bargain!  


Sunday, 22 March 2015

In Sewing News Today...

 The spring coat is still on my mind. Silver Mom asked me an important question, 
The pattern description also specifies that the sleeve is cut on the bias. Is your sleeve cut on the bias?
Yes, they were cut on the bias. My bad. I should had considered the fabric that I was working with has stretch in it and cutting the sleeves on the bias would only add to the amount of stretch. Thankfully, I have enough left-over fabric to cut another set of sleeves on the grain-line. I would have cut it on the cross-grain if I had a long enough width but we'll see if this works out.  


Summer F-T thought that it "looks like the sleeve wasn't drafted well" but I don't want to say that even though it does look that way. So far this coat pattern has proved to be a well-drafted and beautiful pattern. I think Silver Mom is correct when she asked if I corrected assessed my fabric choice with the design of this pattern. I did not.  

Hopefully, [fingers crossed] the new set of sleeves will work out. 


I also broke down and purchase a pressing mitt which will help with pressing those shoulder seams. I just found the weight of the coat to be too much for getting around the pressing ham. It looks like I am all set, I just need to sit down and remove those seams so I can get back to the sleeves.  

Meg over at McCall's has also been helpful with another project that I'm working on, the wrap dress. 


I was hoping for more advice and guidance from the much anticipated section on sewing with knits when I wrote this, 

I was also hoping for more in regards to this topic. The last knit wrap dress I made I had a great deal of difficulty with sewing my knit fabric and I was hoping for more guidance and help in this department. I did use a ball point needle and sewed tried both the knit stitch (lighting bolt stitch) on my machine and the straight stitch and still had trouble. I do believe I spent a great deal of time digging out bunches of fabric pushed through the needle plate. Oh well…

Meg promptly replied to those of us who are challenged by sewing knit fabrics. Thank you Meg! Her suggestion to my previous wrap dress sewing frustrations is
Meg Carter

Hi Graca! I would try starting the seam on a piece of tissue paper first. And sewing with tissue under the fabric might be worth a test. But I wouldn’t stabilize the seams with interfacing as that may affect the hand of the fabric too much. I wish I could be of more help but I’ve never had this happen with any of my machines. Curious!

I'm going to give it a try. I have tissue paper in my stash and again with fingers crossed this will be a solution that works. I can not properly express how thankful I am for the online sewing community and all the advice they are willing to share. Thank you!!!


I also have to give a shout out to those working in fabric stores who also share their knowledge. I stopped by my local fabric store where one of the lovely and knowledgable sales ladies suggested these needles for my knit fabric. Again, fingers crossed.  

Well, that is all in sewing news today... 

Happy Sewing!  


Saturday, 21 March 2015

National Quilting Day!

I'm not a quilter. Yes, I did recently finish a quilt but that was one rare occasion and it took three years to complete. And there are those sweater blankets that I like to make. But deep down I'm more of an admirer of quilts.  

And I really admire quilted clothing. Have you seen all those kantha quilt jackets that have been popping up all over the internet recently? They're absolutely gorgeous and look so comfortable. I have no plans to jump in an join in the kantha quilt fun but today on National Quilting Day I thought I would take a tour of other's creative quilted clothing projects.   

{Source}

{Source:  Pinterest}

{Source:  Threads magazine}
{Source}
{Source}

{Source:  Pinterest}

How about you, do you use quilting techniques in you sewing projects?

Happy Sewing and National Quilting Day!


Tuesday, 17 March 2015

Close, but not quite...

First, thank you to Twisted Poppy and SilverMom for their advice on the set-in sleeves that have been keeping me up at night. I can't express how much I appreciate the sewing community that is willing to share their experiences and help out with problem solving ideas. Thank you, from the bottom of my heart, thank you so much!  

I took the coat and sleeves to work and during my lunch break, I unstitched my stitches. When I came home, I replaced the one row of ease stitching with two rows between the stitching line and cut edge. 


The row of ease-stitching closest to the cut edge was stitched with a 3.5 stitch length and then the next row was stitched at a 3.0 stitch length.  

When it came to sewing the sleeve to the armhole I replaced my regular presser foot with a walking foot, turned down the stitching speed and had my tweezers near by in case I needed to shift some fabric along the way.  

This is how it turned out.  


It is still not pretty. 

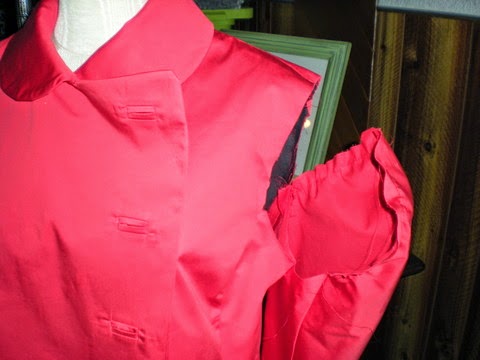
I think I will have to agree with SilverMom about that "dang cotton" which appears to be a real beast to tame. Cotton stretch sateen is proving to be a poor fabric choice for this design as it is showing every little pucker and wrinkle like nobody's business. I should have broke the bank and picked up some non-stretch red satin instead. But then I'm sure there might be cursing about sewing slippery fabrics.   


I'm going to to try to do some more work on this, unstitch a few spots. I might even have to resort to  unstitching the whole thing and recutting the shape of the sleeve cap as Twisted Poppy suggested. Oh and maybe running to the fabric store and investing in a pressing mitt. I'm close, but not quite there yet. 

This project is taking more time than I ever thought that it would. For now, I think I should put it aside and put my energy towards those chemo caps since my Lenten sewing project has taken a back seat while the sewing mojo took a hit and I was distracted by these damn sleeves. And there is that wrap dress sew-along too. So many plans, so little time!  

Stay tuned and happy sewing!  


Monday, 16 March 2015

Sleeves on My Brain

I can't sleep. Those darn sleeves are keeping me awake.  


Twisted Poppy offered the idea of reducing the sleeve cap which I think will work but I'm concerned with how it will affect the sleeve hemline which has already been interfaced and sewn. I might have to resort reshaping the sleeve cap but I'm going to give something else a try, easing.

Yes, I did ease stitch my sleeve but I did it as a single line of ease stitching on the seam-line at four stitches per inch.  

And then I found this online,
Easestitch as indicated between the small dots. As is my usual habit, I do not easestitch along the seamline, but rather just outside of it (closer to the raw edge). This way, my easestitch doesn't peek out from my seam in the final product. I would only increase the standard stitch length by 1 (e.g, if you normally use a stitch length of 2, switch it to a 3 for the easestitch). This ease stitch should not result in a visible gather, and we're going to need a very light touch with this one as we go forward.
This comes from a well-written blog post over at Stitching in the Ditch called Putting in a Set-in Sleeve (version 1). And there is more, 
Use the easestitch that is closest to the the raw edge to gather the sleeve between the small dots so that the fabric can lay flat. This isn't tricky, but there are two things to remember here. First, you want to make sure that the gather is very evenly distributed and that you don't have bunches--those are going to translate to unsightly wrinkles and puckers in the final product. Second, you want to transition the gather to your seamline by using your interior easestitch: Gather half as much along this interior line as you did along the exterior line, and your ease stitch will even out at the seamline to a nice, clean line without any folds or puckers. 
It can't hurt, right? I'm back at work tomorrow but I'm coming straight home to give this a try. Fingers crossed.  

Happy Sewing!  


Sunday, 15 March 2015

In Sewing News Today...

The vintage Vogue Sybil Connolly coat pattern is proving to be quite the challenge. 


I started sewing the sleeves but then I gave up because the ease around the cap was not enough to deter a gathered sleeve from happening.  


Not only am I not a fan of gathered sleeves, I'm desperately trying to achieve the style of sleeve found on the pattern envelope photograph and illustration. It is not working out so well.  Could it be that my stitch length was too long when easing the cap? Or could it be that the easing does not go all the way around the top of the cap?   


That couldn't be it, could it?  


It does seem a bit odd that the pattern doesn't ask for easing at the shoulder point of the sleeve cap. I never seen this before.  Needless to say, I'm taking a break from the coat until I can figure out how to overcome this hurdle. Suggestions are most welcome.  

In other sewing news, there is a new pattern in my collection. It is a vintage Betty Jackson couture pattern from Vogue's Individualist line. It is from 1988 and I found it interestingly unusual in that this is also a multi-sized pattern. Most of my collection of patterns from that era as single-sized patterns.   


I'm smitten over that ankle length skirt and long sleeve shirt. So much so, that I went out to pick up some fabric.  


The plan is to make the skirt in this light-weight grey suiting fabric and the blouse in this white and grey pinstriped cotton. If I can manage to complete this outfit in the next few weeks, I would like to wear it to the opera next month. 


And while I was shopping for fabric I found this cotton print. I couldn't resist, thinking that it would make a cool blouse. My bad. So much for that sewing resolution that involved fabric... 

I'm going to take a break from the spring coat and get out and enjoy some of this gorgeous spring weather we're blessed with today. And maybe get some projects cut out this evening. What's on your sewing table?  

Happy Sewing!  


Friday, 13 March 2015

Does This Count as a Muslin?

I will admit, I haven't even finished tweaking my pattern. I can cross off "choosing your wrap-dress style" and "choosing your fabric" off the sew-along list but not the muslin.

I wonder if previously making this pattern counts as a muslin?

I tried it on back-to-front and know that I would like to lower the back neckline some. And I'm not all that keen on a centre skirt seam if I am going to wear the wrap dress front-to-back.

The biggest change that I need to do to the pattern is to remove the shoulder and waistline gathers on the front bodice piece. Oh and I would like to shorten the tie length. All from revisiting my first version. Yeah, I don't think I need to make a muslin [fingers crossed].

According to the schedule that McCall's Pattern Company has posted, it looks like I still have some time to work on the changes before we start sewing.  
  • February 16:  Announce Sew-along
  • February 23:  Choosing Your Wrap-dress style
  • March 3:  Choosing Your Fabric
  • March 9:  Making a Muslin
  • March 16:  Sewing and Working with Knits
  • March 23:  Sewing the Neckline Area
  • March 30:  Making the Sleeves / Hemming the Skirt / Finishing up
  • April 6:  The Big Reveal!  
Once I have these changes done to my pattern pieces, I'm going to cut out my fashion fabric and I should be ready to go with sewing this up next week.  

Happy Sewing!


Thursday, 12 March 2015

Let's Just Maximize This Hemline...

Stash busting 2015:  Pullover Dress

Fabric:             3 metres 100% polyester @ $20.34 ($6.00/metre)

Pattern:           Butterick 6169 @ $8.27 ($3.99 during online sale + taxes and shipping costs)

Sewn on:        Janome 4120 QDC using a regular stitch and presser foot.    

Seam finish:    Serged on Janome MyLock 234D.  


Have I mentioned how over I am over the hi-low hemline trend? I was all smitten over this dress design except for the hemline. I picked it up with the thoughts of lowering the front hemline to fix the design to my liking.   


I made a few changes to the design. I lowered the highest point at the front hemline by seven inches and evened the hemline out all around ending up with a maxi length dress. I gave the dress a little more ease in the hip area which the envelope description describes as "semi-fitted through hips" since that tends to be my most generous body part. I also left off the yoke lining.  

I am thrilled with how it turned out. Can I just say how comfortable this dress is--seriously comfortable! My favourite feature would have to be the soft gathering at the yoke and those front pockets at the princess seam. I love a garment with pockets!    

I made this dress in a polyester fabric that has been in my stash for quite some time now. It is nice to finally stash bust this one. I'm already planning another version of this dress in a knit. I can see this being my go-to summer dress.  

Happy Sewing!  


Wednesday, 11 March 2015

I Love Ferrero Rocher

Ferrero Rocher, those little hazelnut chocolates, love 'em. I love them because they are packaged in those little plastic boxes that happen to be perfect for storing my threads. 


I don't know why I didn't think about this earlier!  


I love the idea that my threads won't get all tangled up and ~gasp!~ I can see what colours I have without digging through the thread drawer!  


Now, isn't this such a delicious idea?  

Happy Sewing!  


Monday, 9 March 2015

Coloured Blocked Top

Stash busting 2015:  Pullover Top

Fabric:               2 metres silk noir @ $22.37 ($9.90/metre @ 70% off + taxes)

Pattern:             McCall's 7093 @ $9.03 (on-line sale price + shipping + taxes)

Sewn on:          Janome 4120 QDC using a regular stitch and presser foot. No hand stitching.    

Seam finish:    Serged.  


Okay, I will even admit that it seems a bit odd that I would pick up this pattern since I have been proclaiming how I'm so over the hi-low hemline. I actually picked up the pattern because I liked the seaming and the side pockets. I'm all over those pockets!  


Nakisha's made this top and she pointed out 
It has a pretty exaggerated hi-low hem so if you aren't into that, beware. I really like it!!
I will admit that the hi-low hem looks great on Nakisha but I don't have her figure and any design feature that will draw attention to my less than perfect parts I think I would like to change.  That is what I did.  I lowered the hemline in the front, side and pocket pattern pieces (to try to hide the buddha belly) and raised the hemline in the back in hopes to even the hemline out.


The front view of the top looks like it is quite oversized but it is not. There is not a great deal of ease.  I cut this top out in a size 14 at the neckline and armhole.  From the bust point, I graduated towards the half-way mark between size 18 and 20. Can you believe that I still find this a little snug? In defence of the pattern, my mid-section is a problem area.

I have picked up a few top patterns because I'm in desperate need of losing weight and feel I have nothing to wear when it comes to top selection. And the weight loss journey has not been going as well as I wish. I'm not giving up, I just need some tops that fit until I achieve my ideal weight.


Although I tried to even out the hemline, it is a wee bit longer in the back and I can live with it. If I made a version without pockets I would shorten the top about three inches. I didn't do that to this version because I didn't want to lose any of the pocket length.

I used silk noir for both fabrics. The black fabric has been in my stash for decades. It is the same fabric that I used to make this dress. The purple (yes, I know it looks blue) silk has been sitting in my stash for a couple of years. I really like these two silks together.

I didn't follow the instructions when putting this together but I did take note about Nakisha's comments about the neckline and sewed the seam allowance an eight of an inch smaller. I was pleased with how it turned out. I finished the sleeves with an inch hem that I stitched on the machine. I used a rolled hem for the lower hem. For the most part, I'm happy with how it turned out.

It is a quick project and it was a nice distraction from the vintage coat that I've been struggling with this weekend. Sometimes you just need some easy sewing.

How does it compare?

I couldn't find a comparable silk noir version but I did find a similar silk knit version.

Retail price:  $234.00

My silk version:  $31.40


Sunday, 8 March 2015

Make It Happen!

Today is International Women's Day.

It started here in North America back in 1909 and has spread around the world. This year's International Women's Day's theme is make it happen. It is a rally call for the countless issues facing women today, depending on what part of the world you are standing in. We might think that issues change over time.    

{Source}

Or do they just change locations?  

{Source}
As we celebrate International Women's day, I hope that we can consider and remember that how we make it happen is just as important.

Happy Sewing!  


Year in Review

Well, I guess I will start with some stats.  In 2024, I focused on two things, sewing from the stash and no more polyester.  Let's start...