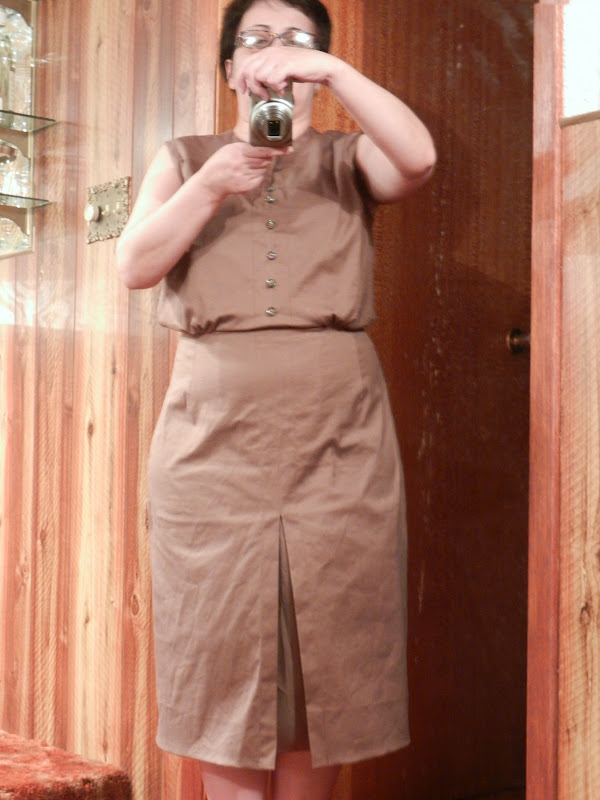
 The Vintage, Vogue 9229, dress is finished! Okay, not quite if you count pressing. I guess I should drag the steamer out.
 Vintage Dress Update: Almost Finished!
But I'm really excited to show you.
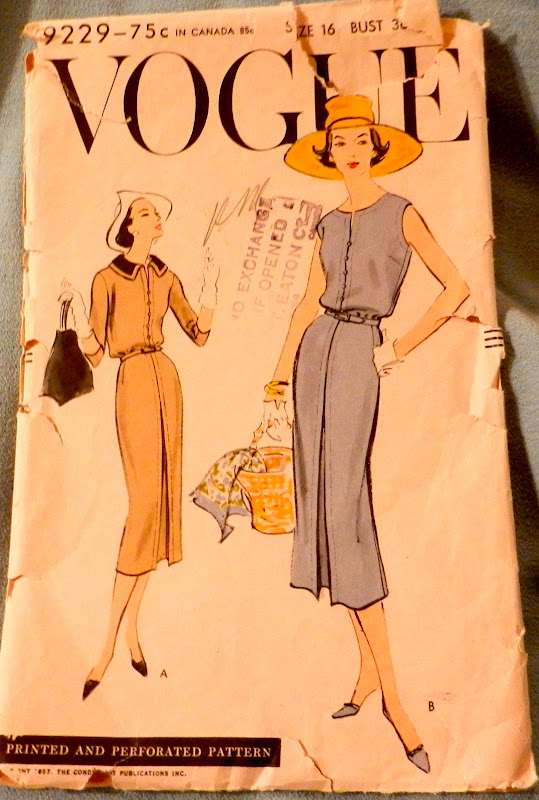 I have to say, that I really like how the dress looked on the pattern illustration, very chic I thought.
 As you likely read, I've made this dress as an entry for the Pattern Review Vintage Contest. I'm not expecting to win, not all the entries are in yet but have you seen them? Wow! There are some beautiful entries. But I didn't enter to win anything I really did want to discover the differences between vintage and current patterns. And there were many! I've even discovered some new-to me techniques. And that is what this contest is all about.
Here are some details about my pattern:
- Vogue 9229, dated 1957 on the lower left corner of the pattern front.
- Not found anywhere on the web when I went searching for it. I was wondering if anyone else made it because I was worried it would be too slim for me to make (mental note: purchase spanx). I couldn't even find it on Vintage Patterns Wikia. So, I nervously went to work hoping that it would fit.
- The pattern envelope is very fragile and I think that I'm going to frame it in hopes to preserve it.
- The pattern pieces inside the envelope were in excellent condition.
- First perforated pattern that I ever worked with, love it.
- Pattern review warned that most vintage patterns "run smaller than modern patterns". I found this to be true. The pattern I used is a size 16, I would never fit into a size 16 in a contemporary pattern. I feared that the blouse would be too tight after examining the bust measurements on the pattern envelope but it worked out fine.
- "Minor design changes are allowed" in this contest. I did have to shorten the dress. I don't know if seven inches off the hem length count but I'm five-one, I'm hoping that it won't be considered major.
Fabric and Techniques:
- Cotton is one of the fabric choices listed on the envelope. I did make my dress out of a cotton sateen. Where it strayed from the 1957 selection is that its a stretch cotton sateen. Thank goodness because it is a fitted skirt.
- The colour of my fabric was based on researched into fashion trends in 1957. Brown and black were hot colours back in the day. Since black does not photograph as well as brown, that greatly influenced my choice.
- This pattern stated that interfacing was optional, and I opted out of interfacing the dress.
- Techniques that I learned about while making this dress include the hem, transfer markings, and belt making. I did not make a belt to go with the dress. But I did follow the technique for inner belting. I used gross-grain ribbon and sewed the snaps but I found it uncomfortable and difficult to close from the side zipper placement. And out came the seam ripper.
- I did use one of the techniques described on the instructions, tailor's chaulk, for transferring stitching lines through the perforated pattern.
- And I used seam tape for my hem. Did you notice that it is vintage too? You can tell by the packaging, now-a-days it is not packaged in cardboard that includes instructions inside the packaging.

 The dress:
 Described as an one-piece dress with a slim skirt with a released pleat at the front and a blouse that joins at the waist-line with strategic gathers.
I made Version B, the sleeveless dress with the oval neck-line, decorative button trimming at the front and one inch topstitching around the armholes, neckline and centre front.
 I don't usually go for sparkly things but I thought these buttons were the cat's meow. The buttons are purely decorative but I really think they make the dress special.
 I mentioned in the other post that I was considering using pinking shears on the seams but I'm glad I didn't. I don't know how I would have cut through all those layers of fabric where the pleat met with the blouse at the waistline.
 Sew glad I used the serger.
 And that is the story of my adventures in Vintage sewing.


.png)
.jpg)


Ooooh! I used those same buttons on my corduroy jacket! Aren't they lovely? I think they look like little crystal bowls. :)
ReplyDeleteI really like how your dress turned out! It has some lovely details, especially on the front bodice. I like the faux button placket with the slit opening, and the gathering at the waistline. Very pretty. :)
Thanks Heather. I agree about the buttons, I fell in love with them when I saw them at the store. I picked them up without a project in mind. I'm glad I indulged in that impulse purchase, I think they 'dressed up' the dress.
DeleteI like how your dress turned out too. The changes you've made are minor so your entry does qualify for the Vintage Pattern contest.
ReplyDeleteI'm making up a size 18 dress and the tissue fit seems to fit me as is so your note about sizing being smaller than today is true in my case.
YAY! Such a lovely dress! I just love the lines and how chic this is ...those buttons are fantastic too!
ReplyDeleteThe dress looks lovely, and the buttons are just fabulous! The cut and style is very classic and chic!
ReplyDeleteOh I love the shape and cut of this, the buttons are a great pop too!
ReplyDeleteI just realized you wrote this more than 2 years ago but what the hay... I Think it was c. late 60s patterns changed a full size. Size 16 became 14 etc. Best thing you can do is record the measurements of good fitting garments and measure patterns before you cut. It's also a good idea to make a wide seam allowance if you feel the cut might be too slim or if you tend to like a fair bit of ease. You can always make smaller but cannot make larger. Vintage patterns have some excellent features today's patterns have short-cut or abandoned altogether - things like little back neck or shoulder darts, sleeve darts, curved bottom seams of long sleeves, little darts here and there, etc.. It's sometimes no wonder why so many sew knits. They stretch and forgive all the little fitting things that have been lost by the 2D world of computerized patterns. Many of the c. 1970 patterns were quite fitted. You can get a good fit and learn a lot of little tips and tricks to take with you into your future sewing. I think today's pattern measurements are a bit larger in the waist. If you come across a pattern you like, try to get as close to your bust size as possible. Waist and hips tend to be easier to adjust than the bust and shoulder. Pattern size grading info is available free on the web. Thrift stores sell old patterns for a buck or two. Buy and try a couple oldies and you'll be a pro in no time.
ReplyDelete